Get free Mastering Tips for better sound for your music productions for streaming, CD, or Vinyl. Learn more about Music Mastering and the best Mastering Effect VST Plugins. Organize and set up your Mastering chain for your EDM, Techno, House, Downtempo, or Hip Hop productions.
How to set up a perfect Mastering Signal Chain - to get the best out of your music production.
Music Mastering - learn what plugins to use for mastering. In the last chapter, I discuss the perfect Mastering Loudness Levels with LUFS. Here you also get some information about the mastering process for Vinyl.

What do use in your mastering chain, and how to master music to get the perfect sound? Here are some steps on how to reach quality audio Mastering. How I improve music and the techniques I use for my mastering chain depends on the audio material delivered.
Best Mastering Plugins:
There is a large selection of mastering plugins; many can achieve high-quality sound. To get the best result, you must test and see which sound characteristics you like the most. In my effect chain, over ten tools are running. An important role is played by the mastering chain order of the plugins, and there are hundreds of possibilities and variations.
Compressors and equalizers can be used several times in your mastering chain. To let the strengths of individual VST plugins stand out more effectively. Also, use your ears and reference other music productions with your songs. Try and test how you can achieve the best results in your mastering plugin chain.
Learn more about how to master a song: try the best mastering plugins on the market. You can also use the following mastering chain order for your tracks. For further questions, please use the comment function.

Surgical Mastering Equalizers, also known as EQs, are an irreplaceable tool for any music producer during the mastering process. Surgical mastering EQs provide precision and control, essential to achieving a high-quality mix.
One of the main benefits of using surgical mastering EQs is their ability to fix problematic resonance frequencies. These frequencies can cause a mix to sound muddy, boomy, thin, or toppy. Using surgical mastering EQs, you can remove rumble from low frequencies and tighten the bass, positively affecting the mix. You can create defined bass sounds and punchy kick drums crucial to a great mix.
Another critical feature of surgical mastering EQs is their ability to improve the width and add rich, airy highs. This is achieved using M/S technology, which allows you to work separately on the mid and side channels. This will enable you to improve the stereo image and bring out details in the mix.
Linear phase EQs are a type of surgical mastering EQ that offers high transparency and is ideal for fixing problematic resonance frequencies. They allow you to make precise and accurate frequency adjustments without introducing unwanted artefacts.
Surgical Mastering EQs are essential for any music producer during the mastering process.
Some of my favourite surgical Mastering Equalizers are:
Some of my favorite surgical Mastering Equalizers are:
DMG Audio EQuilibrium
Three Body Technology - Kichhoff EQ
Maat TheEQBlue
Balance Analog Magpha EQ
Eiosis Air EQ
Crave DSP - Crave EQ
Soundtheory Gullfoss
ToneBooster EQ 4
Massenburg MDWEQ
PSP MasterQ2
Maat TheEQOrange
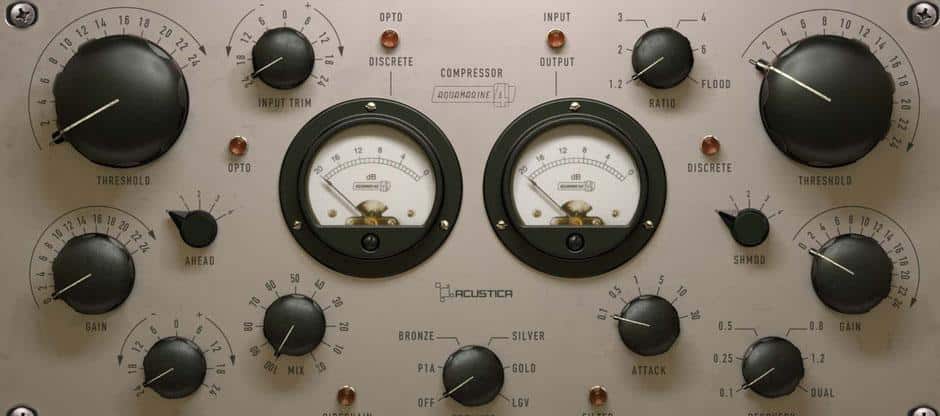
How to Master a Song with a Compressor? Use High-end Mastering compressors plugins that sweeten the sound and glue your mix together.
Mastering a song with a compressor is crucial in achieving a polished, professional-sounding recording. When mastering music, starting with the best mix is essential. This will ensure that the compressor works from a solid foundation rather than trying to fix problems that should have been addressed during the mixing process.
To tame problematic parts and smooth out peaks of your song. You can set the compressor to a moderate ratio and low threshold, aiming for a gain reduction of -2db to -5db.
Also, try parallel compression to add depth and character to your mix. This technique involves running a copy of the mix through the compressor. This compressed copy is mixed with the original mix to add thickness and glue to the overall sound.
Another technique to try is M/S compression. This involves compressing the mid and side channels separately, allowing you to expand the stereo image and bring out details in the mix.
You can use high-end mastering compressor plug-ins explicitly designed for mastering, such as those in the list below. These plug-ins will have a more transparent sound and will be able to sweeten the mix without introducing unwanted artefacts.
Here are some of the best Mastering Compressor plugins on the market:
Cytomic The Glue
Vertigo Sound VSC-3
Sonoris Mastering Compressor
Softube Chandler Limited- Germanium Compressor
Tone Projects Unisum Mastering Compressor
DDMF Magic Death Eye
DMG Audio TrackComp
Acustiqa Audio Aquamarine
Acustica Audio Magenta
Acustica Audio Ivory
Acustica Audio Tiger
SKNote SDC Stereo Double Compressor

Mastering engineers can significantly benefit from using analogue-emulated equalizer plug-ins, which produce warm high-quality sound. These plug-ins are specifically designed to replicate the unique characteristics of classic analogue equalizers commonly used to shape the sound of recordings.
One of the main benefits of using analogue emulation colouring mastering equalizers is that they can add warmth and character to a mix. These plug-ins can create a smooth and natural sound by boosting the high frequencies and providing a more defined bass. They can also give your songs a punchier and more dynamic sound by boosting or cutting specific frequencies.
Another benefit of colouring mastering equalizers is that they can create a subtle analogue vibe. Many of these plug-ins are emulations of classic equalizers, such as the Pultec or Neve, commonly used to shape the sound of famous recordings. Using these plug-ins, you can create a vintage sound that adds a unique character to your songs.
When using colouring equalizers, it's essential to use them sparingly, as they can easily overpower a mix. When using these EQs, focusing on the overall tonal balance is essential.
Try these character EQs to create a subtle analogue vibe and add punch to your songs.
Some of the best mastering EQs for colouring your mixes are:
Waves PuigTec EQP-1A
Sonimus Burnley 73
Acustica Audio Purple
Maat TheEQOrange
Kush Audio - Electra DSP
Kush Audio - Clariphonic
Maag Audio EQ
Manley Massive Passive
Native Instruments Passive EQ
Acustica Audio Azure
Nebula Bronze
Acustica Audio Ruby
PSP Audioware PSP E27

Mastering de-esser plug-ins work by identifying and reducing excessive sibilance, or "S" sounds, in vocals and other high-frequency instruments. Excessive sibilance can cause harshness or distortion in the final mix, making it unpleasant to listen to.
Noise reduction plug-ins use a combination of dynamic processing and frequency filtering to identify and reduce the presence of sibilance. They typically have a frequency control that allows the user to specify the frequency range to focus on and a threshold control that determines the level at which the de-essing effect is applied.
One of the critical benefits of mastering de-esser plug-ins is that they allow the user to selectively reduce sibilance without affecting the overall tonal balance of the mix. This is especially important in the mastering process, where preserving the overall balance of the mix is critical.
In addition to taming harshness in vocals and other high-frequency instruments, de-esser plug-ins can also reduce resonance in other sounds, such as hi-hats and synth sounds. This can help create an overall smoother and more pleasant sound.
Here are some of the best de-esser plugins:
Airwindows DeBess
Waves Sibilance / Renaissannce DeEsser
Oeksound Soothe
DMG Audio Essence
Hofa IQ DeEsser
Hornet Sybilla
Eiosis E²Deesser
Massey De:Esser
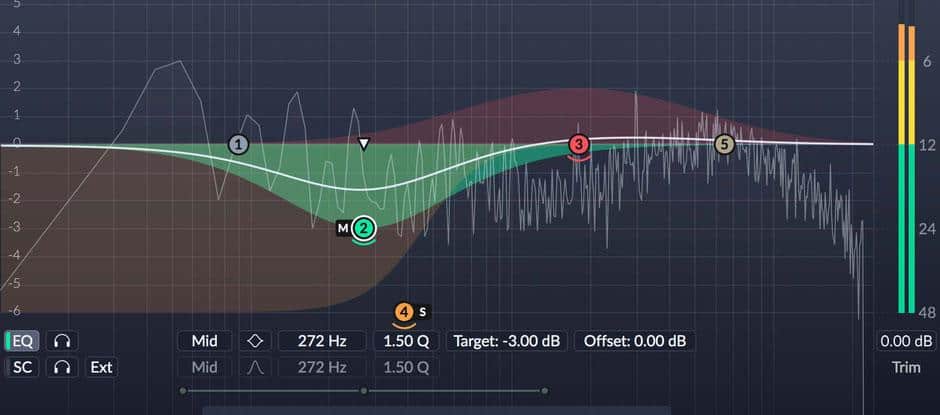
Fine-tuning the frequency spectrum and adding punch and clarity to a master can be achieved using essential tools like dynamic EQs and multiband compressors.
Dynamic EQs, also known as "intelligent EQs," are equalizers that automatically adjust the EQ based on the audio signal level. This allows more precise adjustments to specific frequency ranges without affecting the rest of the mix. For example, a dynamic EQ can be used to reduce the low frequencies in the mix if the bass is too boomy or to increase the high frequencies if the mix is too dull.
Multiband compressors work similarly but allow you to apply compression to specific frequency bands. This can be useful for controlling the balance between different instruments in a mix or adding punch and definition to a particular frequency range.
Dynamic EQs and multiband compressors can help reduce unwanted frequencies and add definition and clarity to a mix when used in mastering.
Keep in mind that perfecting your audio doesn't always necessitate the use of dynamic EQ or multiband compressors. However, there are situations where it can be beneficial to have dynamic access to specific frequency bands. For instance, if you need to manage the high frequencies in certain parts of the song, or adjust the dynamics or volume of particular bass notes or synth sounds, the following plug-ins can come in handy.
Dynamic Equalizer
Multiband Compressors
Waves C6
DMG Audio Multiplicity
Vengeance Multiband Compressor

Analog magic in the digital age: saturation and sound coloration
The fascination of classic analog warmth remains undiminished in the digital world. The days of tape hiss and crackling tubes may be over, but the saturation and character they lent are still coveted. This is where saturation and tone coloration plug-ins come into play - digital tools that recreate the sonic magic of analog devices.
Saturation, the heart of this process, pushes a signal beyond its linear range, resulting in pleasing distortion and overtones. This "thickens" the sound, giving it weight and depth that is often missing from pristine digital recordings. Saturation plug-ins for tape and tubes emulate the specific non-linearities of these media and bring in their warmth and subtle artifacts. Transformers, another key component in vintage gear, add their own character by subtly altering the signal's frequency response.
The result? A sonic transformation. Hard digital edges soften, sterile recordings come to life, and instruments sound more natural and "analog." For mastering engineers and producers, these plug-ins are invaluable tools for adding warmth and character to modern digital productions.
Some of the best mastering software plugins for adding saturation, harmonics, or tube colouration are:
Acustica Audio Crimson
Tone Projects Kelvin Tone Shaper
Shatteres Glas Audio SGA1566
Kazrog True Iron
Kush Audio Omega
Pulsar Modular P42 Climax Mod
Airwindows Purest Warm
SKnote AnyTesla
Klanghelm SDRR
Best tape Machine Plugins
IK Multimedia T-Racks Tape Machine
Slate Digital Virtual Tape Machines
London Acoustics - Taipei
Acustica Audio - Taupe
SKnote Roundtone
Universal Audio Fatso
Universal Audio Studer A800 / Ampex ATR 102
Airwindows To Tape
Waves Audio Kramer Master Tape

Unveil the dimension: Stereo Imaging Plug-ins for Mastering
Among their Mastering chain tools are stereo imaging plug-ins, the secret weapon for expanding and deepening a stereo mix.
Imagine a flat image coming alive in 3D. Stereo imaging plug-ins accomplish this sonic feat by manipulating the stereo field. They can add width, creating a spacious soundscape where instruments seem to breathe. Conversely, they can add depth by pushing elements forward or backward in the mix.
Stereo imaging plug-ins play a crucial role in ensuring that a mix is seamlessly converted to mono. Mono compatibility is essential because many playback systems, from smartphones to streaming services, are mono by default. By identifying and correcting phase issues, stereo imaging plug-ins prevent unwanted cancellation in mono, preserving the integrity of your mix.
Mathew Lane DrMS
Side Minder ME
Goodhertz Midside
Waves S1 / Center
Flux Stereo Tool
Tokyo Dawn Labs Proximity
Tone Projects Basslane Pro 2

Mastering clipper plug-ins can be essential in the mastering chain to achieve high volumes. They are usually used at the very beginning or end of the mastering chain.
Unlike limiters, which prevent clipping, clippers add a touch of harmonic distortion, shaping the sound and increasing the perceived volume. This is very useful for a more aggressive or vintage sound.
Clipper plugins offer controls that allow you to adjust the clipping behavior. From subtle 'soft' clipping to pronounced 'hard' clipping, you can shape transients and add a slight harmonic saturation. This can improve the overall fullness and presence of your master.
But be careful! Too much clipping will only result in unpleasant harshness and distortion. The proper selection and adjustment is crucial for a good result.
Here are some things to keep in mind when choosing a Clipper plugin:
Too much clipping will only lead to unpleasant harshness and distortion.
Careful adjustment with a maximum of 1-3 dB gain reduction is the key to success.
Oversampling: Reduces aliasing artifacts, especially if you turn up the clipper for more volume.
Filtering: This allows you to focus the clipping on specific frequency ranges.
By experimenting with clipping plug-ins and mastering techniques, you can add a new level of control and character to your final mixes. Remember that mastering is about balance - use typical clipping sound to emphasize the identity of your music, not to dominate it.
Kazrog KClip
Airwindows AD Clip
Acustica Audio - Fire The Clip
Sir Audio Tools Standard Clip
DMG Audio Limitless
Venn Audio V-Clip
IK Multimedia Classic Clipper

Want to put the finishing touches on your audio recordings? The Mastering Limiter or True Peak Limiter are your last step in the mastering chain! These special dynamic processing plug-ins meticulously take care of volume peaks and make your tracks louder overall, ideally without affecting sound quality.
These transparent little helpers work their magic by preserving dynamics—the lifeblood of music—preferably without harsh highs, flattened transients, or distorted lows.
Limiter & True Peak Limiter makes your tracks sound fuller and more balanced without leaving behind annoying artifacts. In most cases, the limiter only works with -1db of gain reduction; when extreme volume is required, the maximum gain reduction is -3db.
If you have trouble getting the volume you need and your limiter has to intervene too much, something went wrong during mixing.
Some of the best Mastering Limiter plugins for your master buss are:
DMG Audio Limitless
A.O.M. Invisible Limiter
Izotope Ozone Maximizer
IK Multimedia Stealth Limiter


Mastering loudness: The best LUFS metering plugins
Consistent audio levels are paramount in the age of streaming and online distribution. This is where LUFS meters are important tools for mastering engineers.
These plugins analyze the loudness of a song and ensure that the platform-specific LUFS (Loudness Units Full Scale) specifications are adhered to.
Gone are the days of fighting for sonic supremacy with maximum volume in the mastering chain - LUFS meters ensure a level playing field and a consistent listening experience across all genres.
Popular metering plugins, such as Youlean Loudness Meter, provide a clear visual representation of Integrated (I) and Short-Term (S) LUFS, Program Loudness Range (PLR), and True Peak Level (TruePeak).
With this comprehensive data, sound engineers can make informed decisions. By comparing to reference tracks and adhering to the recommended LUFS targets, a consistent sound can be achieved.
But how loud should you master? The target levels can vary greatly depending on the genre. I use the Short-Term LUFS value (important: LUFS-S). Very loud tracks would be -6 LUFS-S, and more dynamic electronic music would be around -9LUFS-S.
Voxengo Span
Youlean Loudness Meter (Free Lufs Meter)
Melda Production MLoudnessAnalyzer
Sonnox Frauenhofer Pro Codec

Utilizing top reference plugins is essential for achieving exceptional tonal balance in the frequency spectrum in your tracks. These plugins enable you to quickly identify any issues in your mix and ensure that your music sounds excellent on all playback systems.
If you want to elevate your music production or sound engineering abilities, dedicating time to reference plugins is unquestionably a wise investment. With these valuable tools, you can create music that consistently delivers a remarkable listening experience no matter where it's played.
Letimix Gainmatch
Sample Magic Magic AB
ADPTR Audio MetricAB

Taming the room: Optimizing Audio with EQ Software
Producers and sound designers must achieve clear and accurate sound. Great Studio monitors are important, but room acoustics often color the sound.
Enter room EQ software. This software flattens the frequency response by analyzing the room's response and applying corrective filters, resulting in a more neutral listening environment. This translates into better mixing decisions - what you hear in the studio accurately reflects how the mix will sound on other speakers.
Headphone Correction software offers a similar benefit for those working late at night or in less-than-ideal spaces. By analyzing the response of a specific headphone model, these programs create a profile that compensates for its inherent coloration. This allows consistent mixing across environments, ensuring your mixes translate well to different listening experiences.
While room treatment remains the gold standard for studio acoustics, room EQ software offers a powerful and affordable alternative. Similarly, headphone correction software is valuable for producers on the go or with limited space. Both technologies empower creatives to make informed mixing decisions that produce professional-sounding results.
IK Multimedia Arc
Tonebooster Morphit
Room EQ Wizard
112 DB Redline Monitor
Slate VSX Headphone
Goodhertz CanOpener
Waves Audio NX
Audified Mixchecker
What is an Audio Mastering? Learn which steps it takes to master your songs!
Mastering optimizes the punch and power of your music production by thickening the mid-range, tightening and rounding out the low-end and bringing some sparkle and richness to the high frequencies.
Fine-tune the dynamics of your Song, and produce top-notch and up-to-date loudness levels to maintain a well-balanced mix.
Reach competitive loudness levels with compression, limiting and clipper modules. To have a proper sound on any streaming or download platform like Spotify, Apple Music, Youtube, or Beatport (we use PSR and LUFS measurement)
Have a tight and punchy Sound on a huge Club sound system like Function One, Martin Audio, Kirsch Audio or Void Acoustics - optimized for live and DJ surroundings.
Adjusting the groove of your song is another crucial point, such as the bass and the rhythmic drum elements. Small interventions have an essential impact on standing out
Taming the problematic frequencies in your Tracks reduces harshness by EQing and De-essing to sound more natural and pleasant. With Subtractive eq-ing you also get rid of muddy bass frequencies. Dynamic EQs and Mid / Side Equalizer are perfect for a subtle rework of a song.
Add warm, detailed analogue Tape and Tube sound for a nostalgic vibe of classic electronic music recordings.
Or improve the colour and character through Vintage Console Sound. Add extra harmonics and bring shine to your mix to sound clean but stirring.
Fix phasing problems and get your tracks mono compatible. So frequencies do not accidentally extinguish. This could happen if your music production is not optimized for different speakers and media players.
Optimize 3-Dimensional acoustics. Increase depth, generate natural-sounding stereo width.
How loud should I master for Spotify? The perfect LUFS mastering volume is for streaming on Youtube, Spotify, Soundcloud, Bandcamp, Beatport, Apple Music, and more.
How do you master a song with perfect loudness for streaming providers? All popular music streaming services have different loudness standards.
Many of them have a loudness normalization target between -13 and -16 LUFS. If your uploaded music is louder, the volume will be reduced to reach the target value. This way, every song is streamed at almost the same volume level.
Mastering your songs aims to achieve the best possible sound quality. The goal is maximum volume, but it emphasizes transparent and dynamic sound. If you want to take your sound to the next level, you should try to find the right balance between a loud and dynamic master.
My favourite LUFS loudness targets for techno, house and hip-hop are usually between -7 LUFS and -10LUFS. You can also check the LUFS short-time meter and set your target between -6 LUFS and -9LUFS.
LUFS values between -10 and -14 LUFS are also acceptable since dynamics are the main focus when mastering ambient or singer-songwriter productions.
LUFS is a normalization of loudness based on average loudness. Due to the Loudness War, music productions became more and more compressed and, therefore less dynamic. LUFS normalizations or other methods are now used by many major streaming providers such as YouTube, Spotify, and Apple Music. Very loud mastered songs sound quieter on streaming platforms and somewhat flat. Aggressive limiting tends to be detrimental and superfluous to the mastering process. As with mastering for vinyl, this now places greater emphasis on transparency and dynamics.
Here is my overview of streaming shops LUFS loudness targets (LUFS = Loudness Units relative to Full Scale)
Spotify: -14 LUFS (can be changed to -11 or -23 by the user)
YouTube: -14 LUFS
Apple Music: -16 LUFS (when iTunes Sound Check is enabled)
SoundCloud: No normalization
Amazon Music: -14 LUFS
Tidal: -14 LUFS
Pandora: -14 LUFS
Bandcamp: No normalization
Deezer: -14 LUFS
Napster: -14 LUFS
There are some free VST Metering Plugins and Apps to measure LUFS, RMS and True Peaks; you can download them here. Add them as an effect Plugin to your DAW and visualize the true loudness of your tracks and compare with other reference songs.
DP Meter 3 (Free LUFS Meter)
Youlean Loudness Meter 2 (Free LUFS Meter)
Loudness Penalty Analyzer (Use this Web-App to find out if your music will be turned down by Streaming Services)
Various distributors send audio files to streaming providers. Since the delivered music was mastered to different volume levels, Spotify, Apple Music, and YouTube Music want to guarantee the best listening experience when playing the songs.
It would be unpleasant to manually change the volume of each song while listening to playlists. That's why the normalization of loudness comes into play so that all the songs heard feel the same way.
However, you can turn this setting off in Spotify to hear if songs have been mastered at different volumes.
To do this, go to Spotify Settings / Audio Quality / Default Volume and turn the function on or off.
If you want to take your audio mastering skills to the next level, consider exploring some of these top DAW options. These tools are designed to optimize your workflow, save you time, and even create DDP images for CD production or vinyl/cassette pre-mastering. Plus, they offer handy features like metadata management to help you complete your mastering projects with ease.
Reaper
Pyramix
WaveLab
Sequoia
Presonus Studio One
Samplitude
Sadie
DSP-Quattro
Soundblade
Need help optimizing your mastering chain? Get your personal mastering tutorial to get the best out of your songs.
Your questions will be answered individually and adapted to your knowledge level.
Drop me a message with your request to book your mastering course because you can learn the most in a 1:1 class. Trust me; I have spent over 15,000 euros on a music production school myself in the past.
I'm also happy to answer any questions about your mixing problems. Because you can only achieve a good Master if the sound is right when mixing.
I am Marcus, a music enthusiast who runs a mixing and mastering business. Additionally, I compose insightful articles for my blog and produce music as a member of the techno duo Agravik.


© Mastrng.com - Mixing Mastering Techno, Electronic Music - Probsteistr. 7 04229 Leipzig - Deutschland

